Making Fake Rock Waterfalls for Pools

To create, to design, to build and make are the attributes of only one species on earth. Humans. This among other things separates us from the rest of the animal kingdom. And what a great difference and gift it is for us! To be able to take simple elements and turn them into objects of beauty, function, and purpose. This is, in fact, what I’ve been doing for decades. Firstly as a dental technician, then a sand sculptor and more recently working in concrete and steel. Building waterfalls, grotto’s ponds, and pools in artificial rock. But today let’s look more specifically at concrete waterfalls on swimming pools.
What’s the trick? How am I able to create natural and realistic looking strong long lasting projects? Answer: by figuring out the mechanics, techniques, tools and materials needed AND learning and understanding how artificial rock SHOULD look. To often I see rock features that look fake. And there’s nothing worse than fake rock looking fake!
So how does one begin the process of making a faux rock waterfall on a pool? Well you need a pool to start with. A brand new or existing one. With a NEW POOL you can tie your rebar, (3/8” usually works best) onto the rebar of the pool using tie wire, (with a spinner tool or with pliers) and make your boulder shapes, and even your whole project, prior to shotcreteing the pool, (shotcrete being the sprayed on concrete material) if you wanted to. You could also tie some of your rebar shaped boulders onto the edge of the pool, (called the coping or bond) and then finish out the waterfall after the pool gets “shot”, (the process of blowing on concrete to create the structural hull or bowl of the pool). You can even wait till the pool shell has been completely built as well to begin your feature. All three ways I’ve done. This is usually decided by the pool builder and the rock contractor based on what works best for everyone’s schedule. You can of course add a project to an older EXISTING POOL as well by drilling and epoxying your rebar into the pool shell itself… But back to the rebar for a second.
What’s this stuff about? It is the 10’ and 20’, or longer pieces of steel that are used to add strength to concrete construction the world over. Buildings, bridges, roads, towers, and swimming pools all are built with rebar inside of the concrete structures. Why? Because without it these creations would not last or be able to be built to the size and scale that they are. And so it is that our faux rock projects are built as well. Then where to begin?
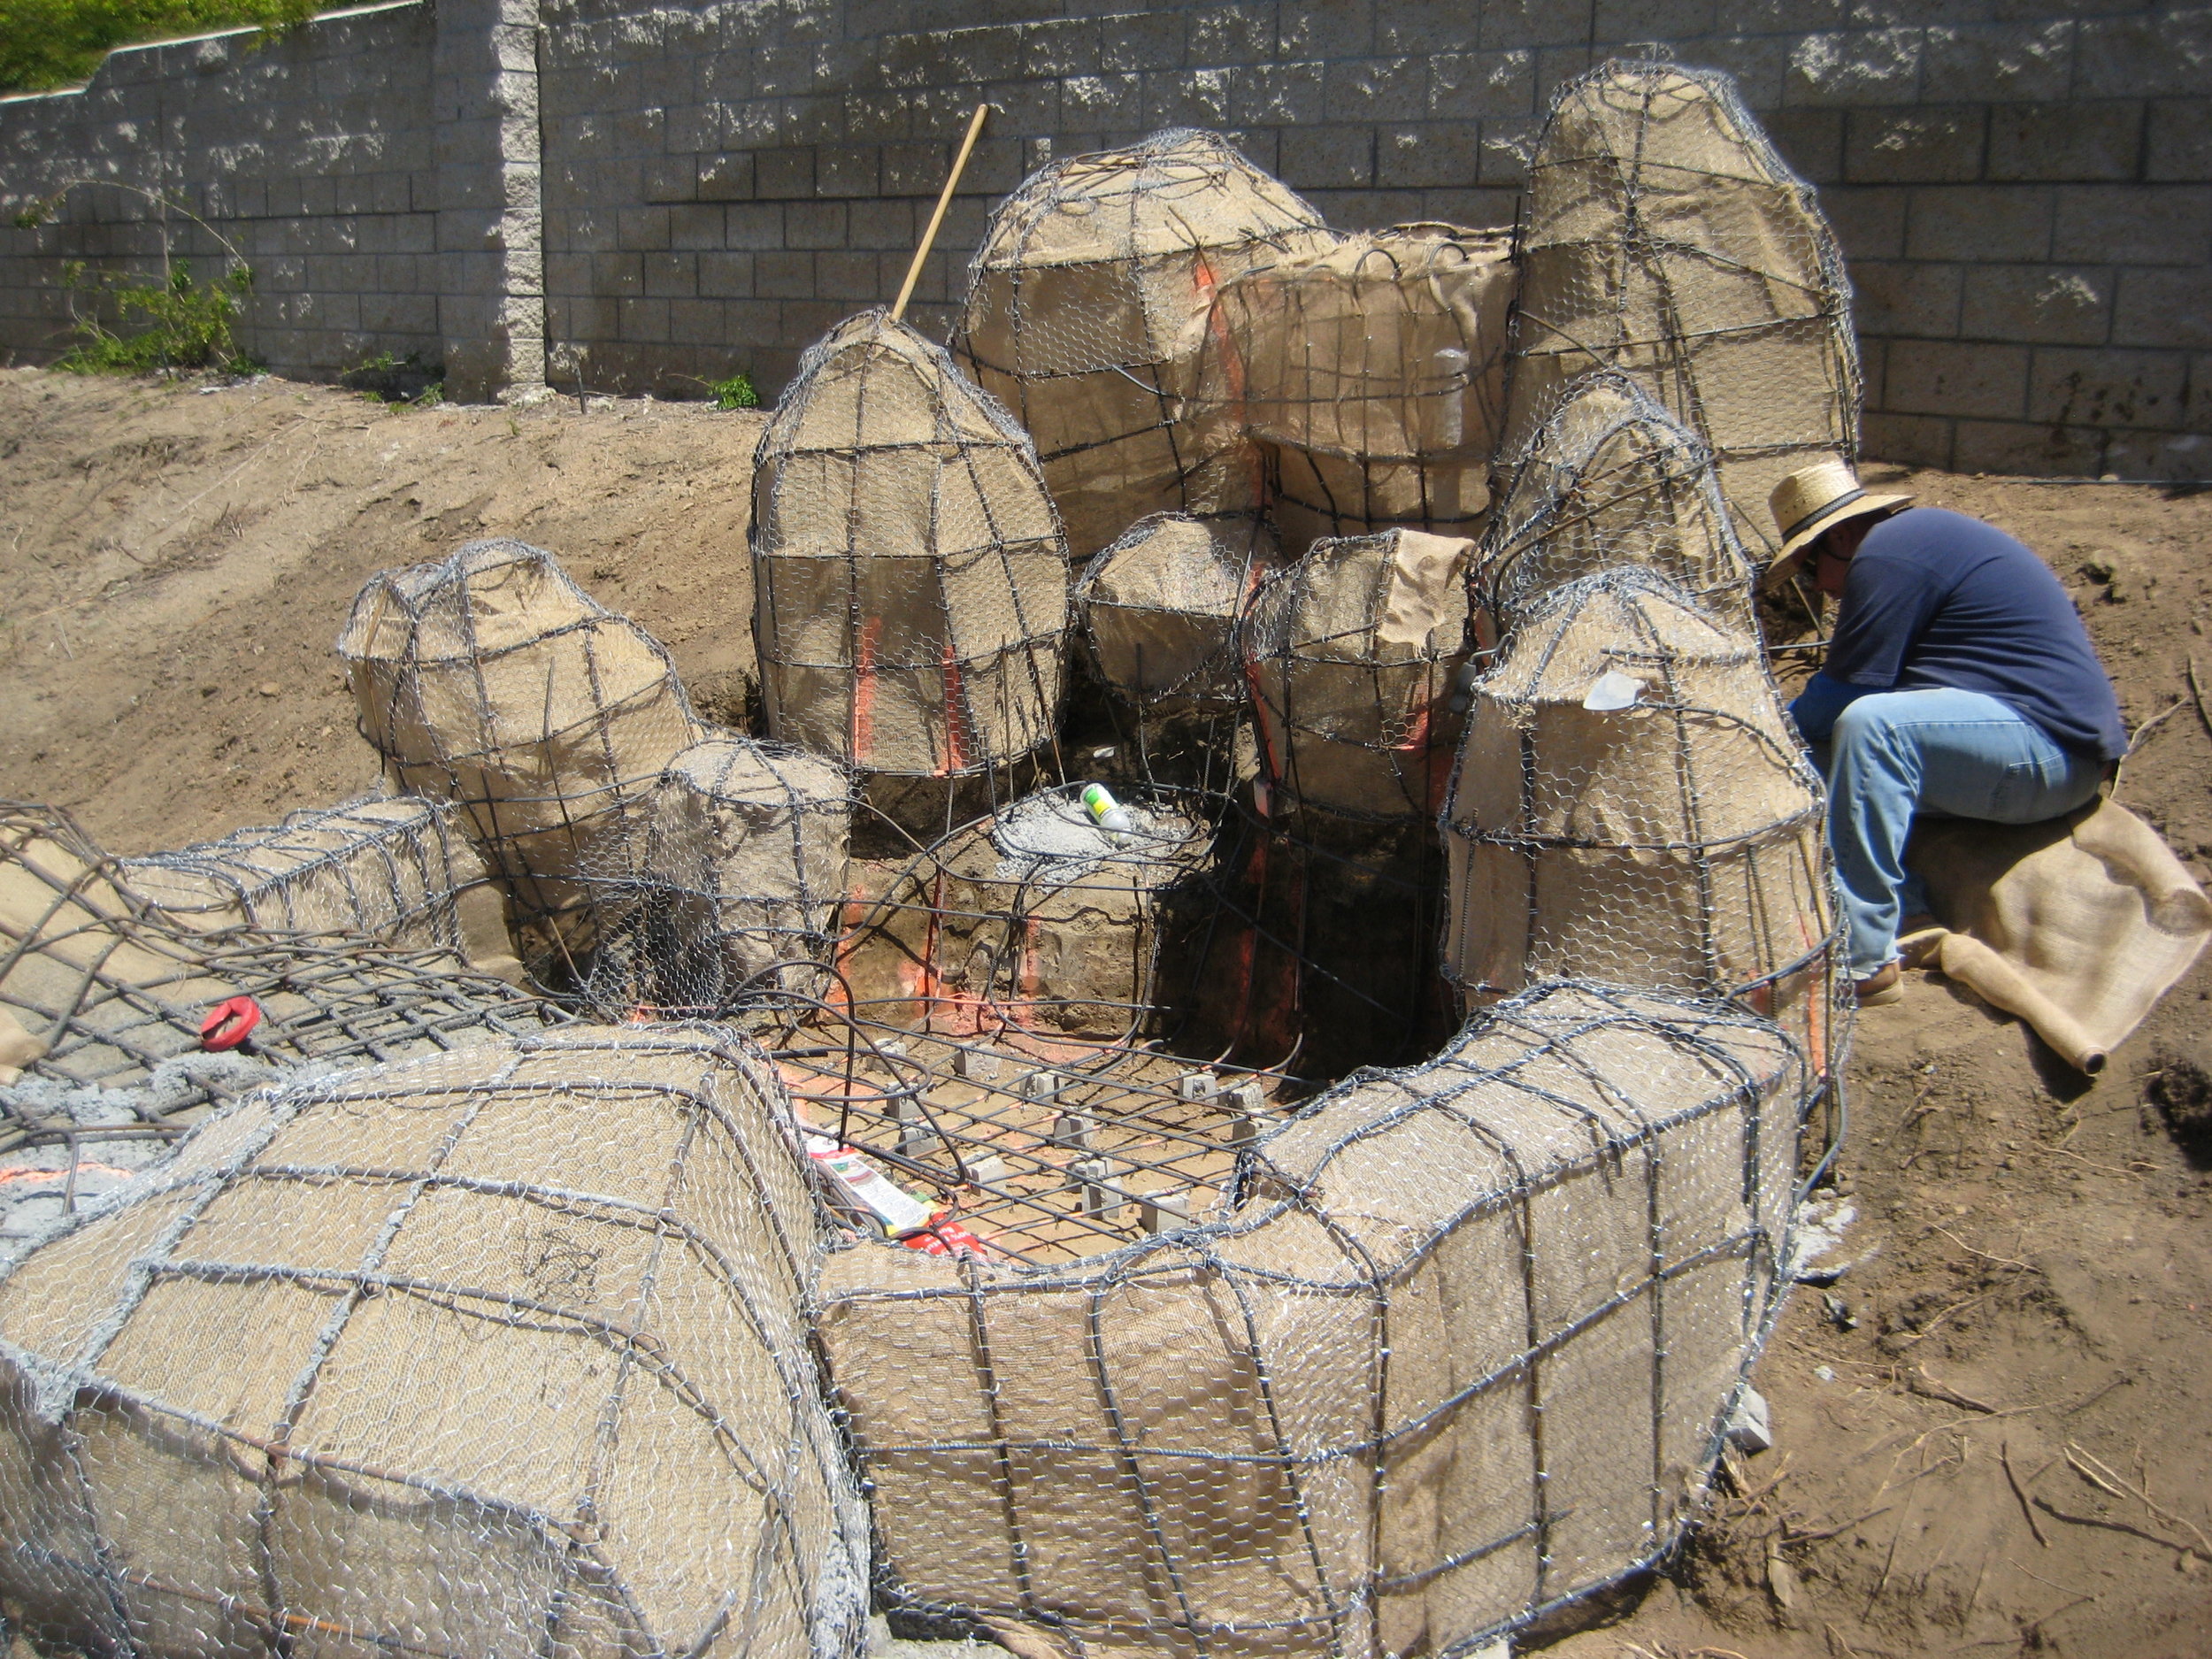
THE START: It begins with rebar. I take 10’ pieces of rebar and start bending them to the size and shape of the rock or boulder I want to make. I mostly use my arms and knee for this. The bars are put together in a crisscross pattern with the gap between the rebar pieces being around 8” to 10”. As in the photo above you see a larger boulder to the left with smaller ones scattered around in the rest of the waterfall. Then I tie, or weave together, the rocks or boulders with additional rebar so that the entire structure is held together in one unit, (see below). OK, so now what?
THE BURLAP: The next part of the process is installing the burlap on the inside or opposite side that the sprayed or shotcreted on concrete will be coming from. This is done with hog rings and hog ring pliers found in the fencing department of a large box or hardware store. They are placed every 8” to 10” or so.
THE CHICKENWIRE: Then 1.5'“ chickenwire is then hog ringed onto all vertical areas of the rockwork. This helps hold the concrete in place when it’s being blown on as shown in the picture below left. Once that’s all done, (and you’ve installed any conduit for lighting and/or pvc piping for watering, and possible drain pipes), you’re ready for the big shotcrete day.
SHOTCRETE DAY!: This is a day when things change in a big way. All the rebar shapes and structures get transformed into what appear to be pretty real looking boulders and rocks! This begins with a towed concrete pumper and a high pressure air compressor arriving on site and setting up. When everything is ready a cement truck shows up and, when ready, begins pouring concrete into the concrete pumper hopper. Now things get loud! When the pumping is at full force concrete gets sprayed onto the rebar shapes at a maximum rate of 200mph! Fortunately the guy running the nozzle is able to turn down the amount of air being blown out as well as the speed of the pumper. And thus within a couple hours and with great skill the entire project gets covered. With all below water level rocks and boulders being made solid so the rebar gets protected from rusting.
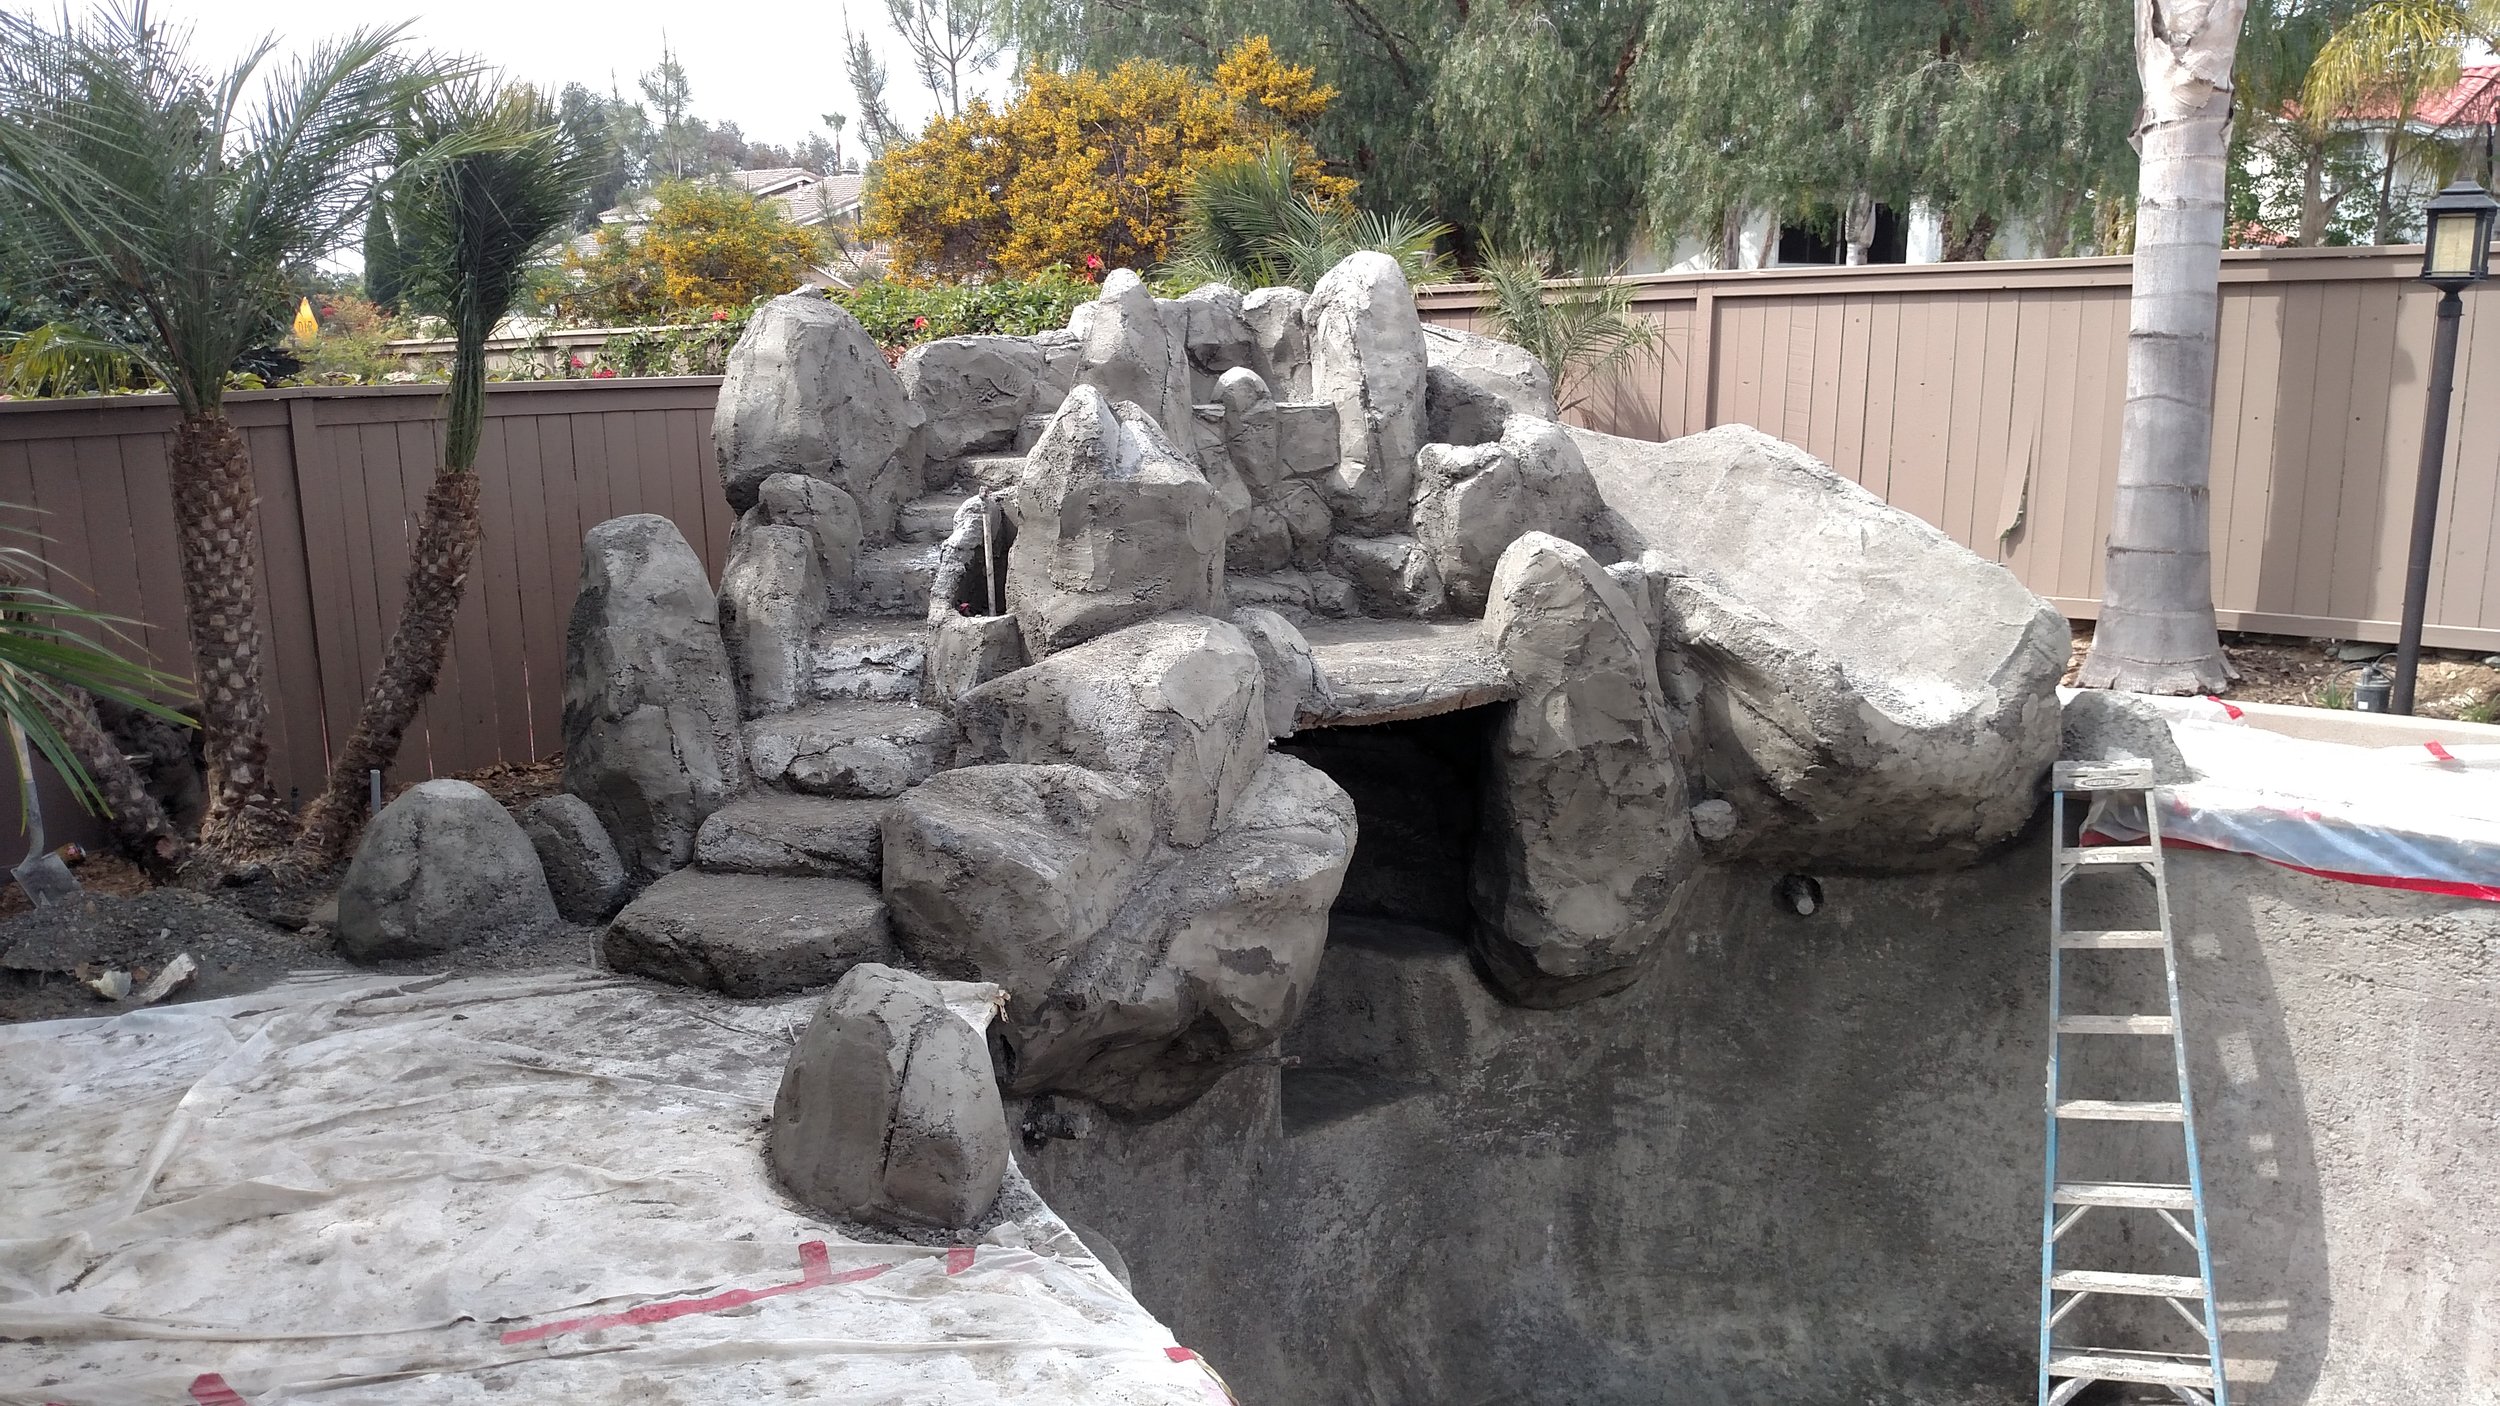
THE CARVE: As the concrete is being blown on the process of carving the concrete, (mud) begins. Some areas can and should be worked on while others need time to harden a little so they won’t fall down and off the structures. This is the time creativity is most important. Knowing how to carve the soft, (though hardening) material will define how well the project ends up looking like real natural rock, (assuming that the rebar shapes have been well designed and composed). Once the day is over the hope is that everything that needed to get covered got covered. However, if some areas got missed then the next step is hand mixing and covering those spots. This is also the time all other areas that need to be covered or filled get taken care of. Where pegboard has been removed or burlap has been exposed and holes or cavities are evident. So fill and patch we go! Then…..
WATERPROOFING: Now the task of waterproofing the project comes in. Wherever water will be sitting, standing, or moving is what must be covered. This is done with a concrete penetrating product as well as a painted on one called a “membrane”. I start with the penetrating product then the painted on one. After this step you’re ready for the final texture coat!
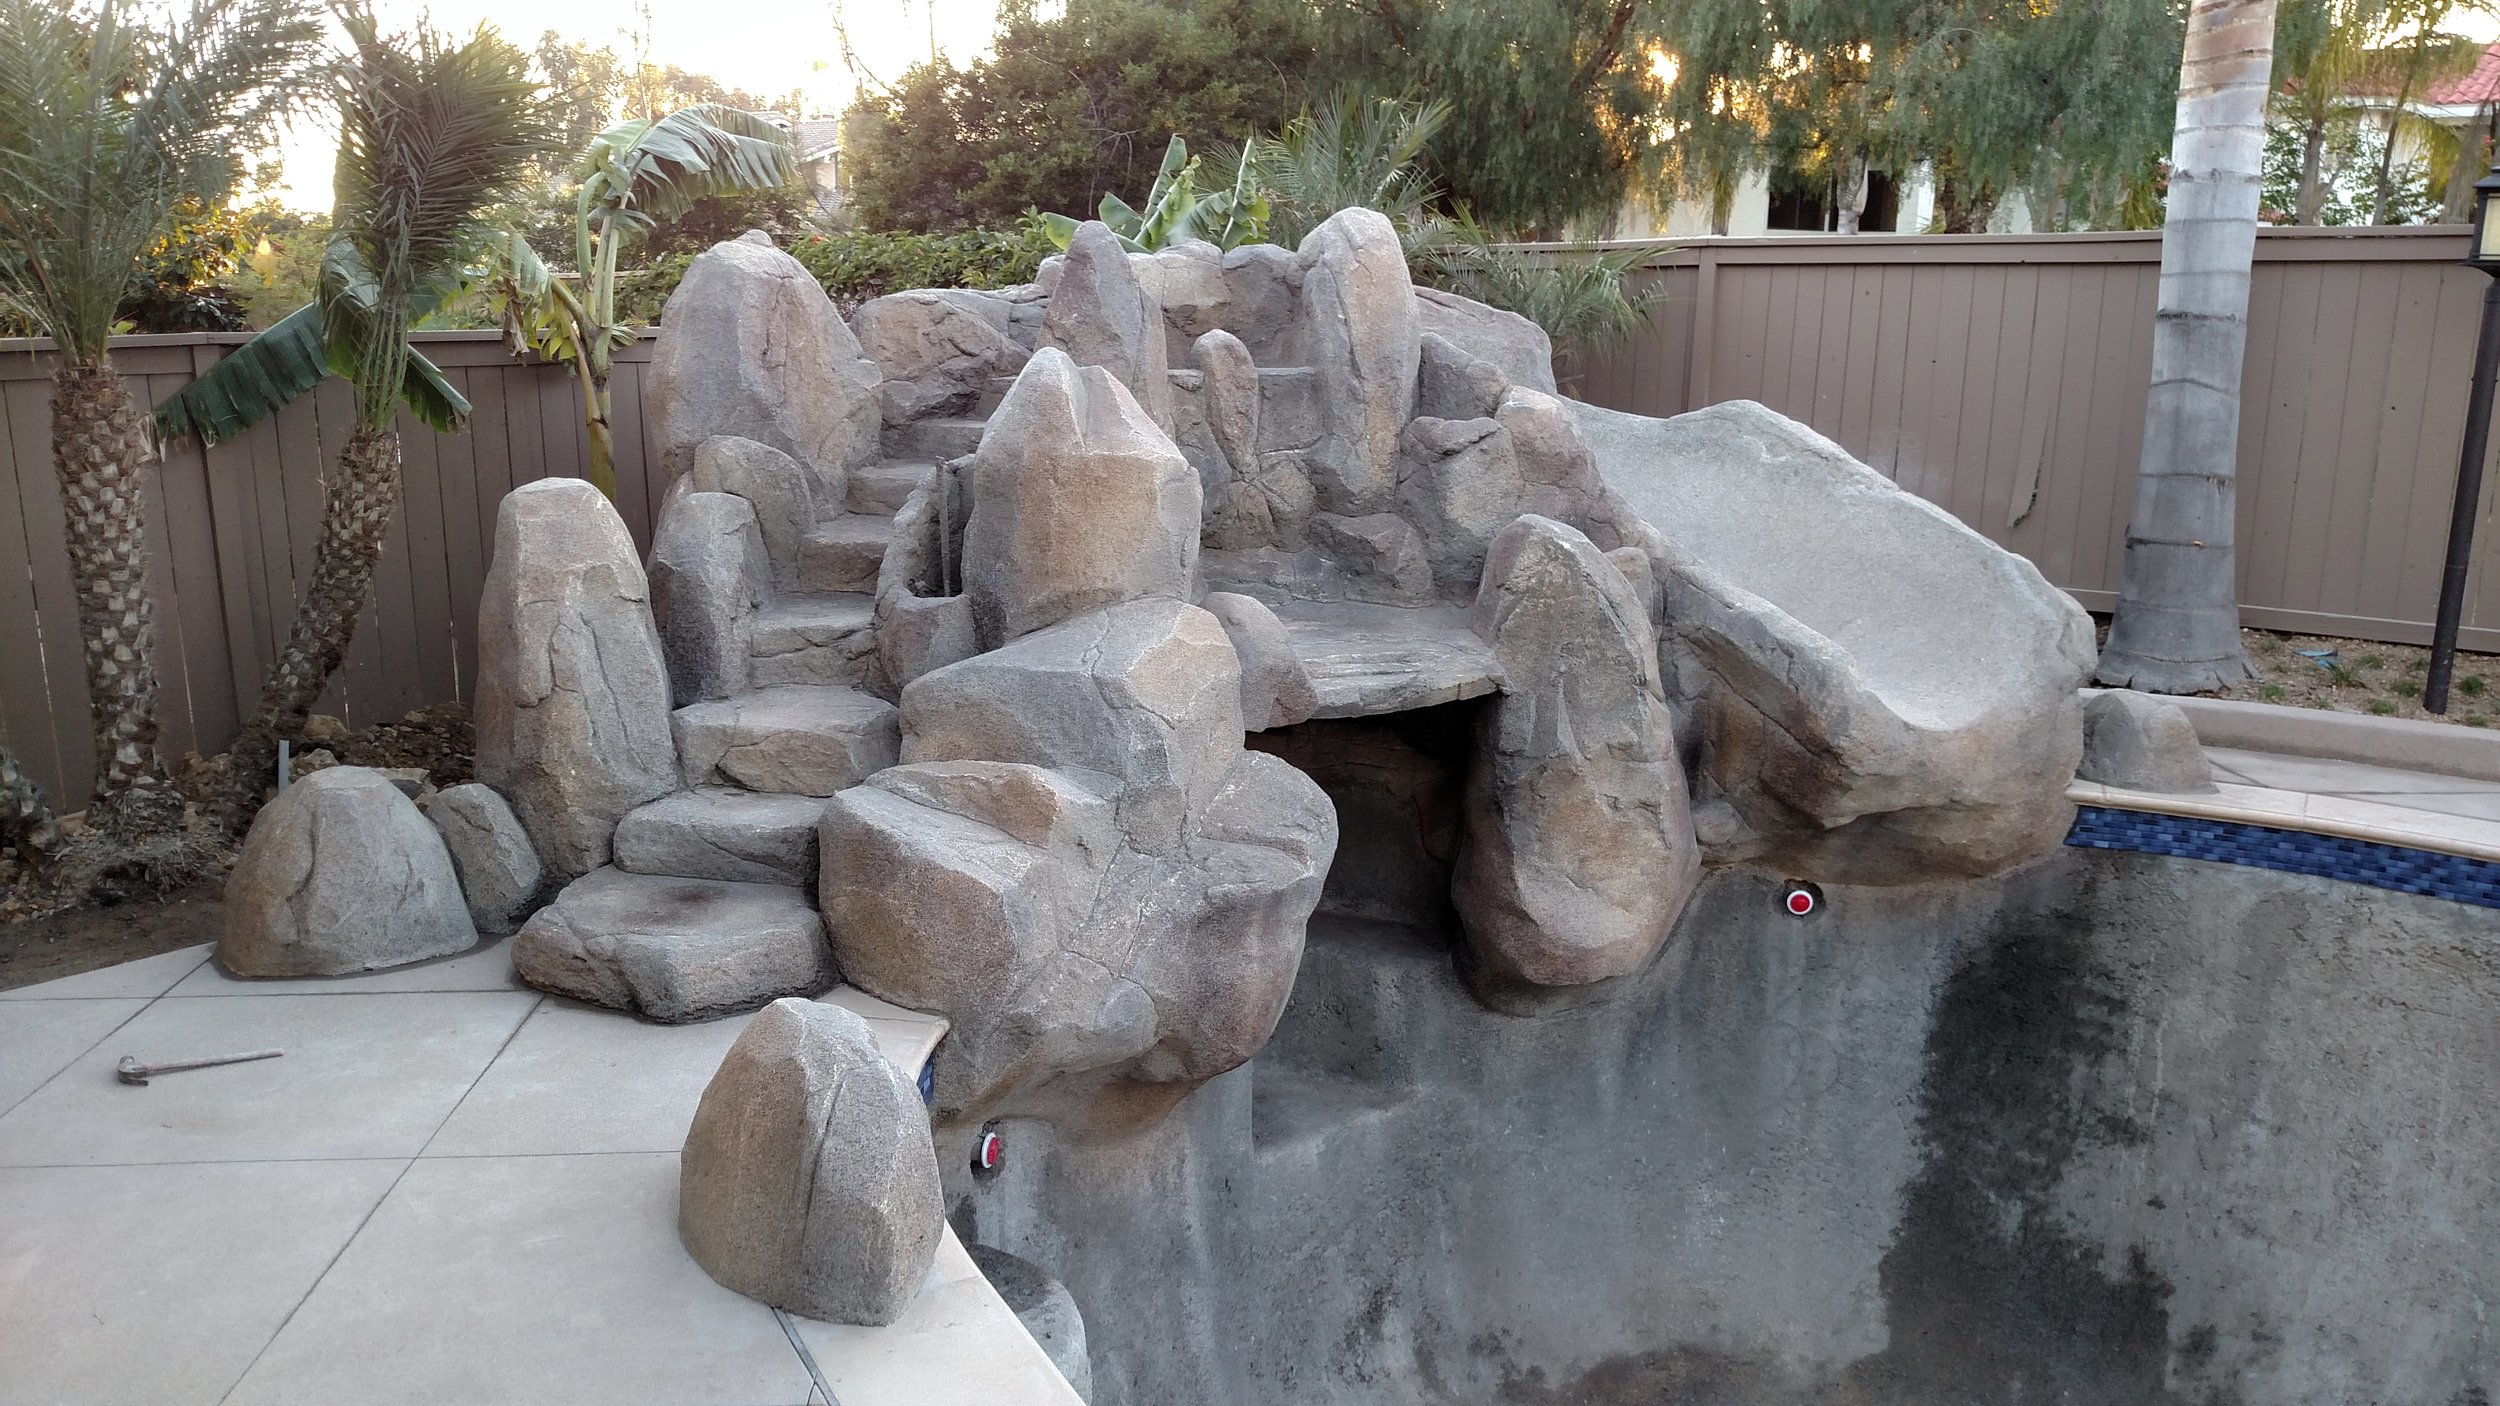
THE FINAL TEXTURE COAT: This is the second “Mud” step. Only this mud is a mortar mix as opposed to a concrete one, (mortar being a sand and Portland cement composition with no pea gravel in it). This is also a step that requires skill and creativity. Final cracks and textures are applied now as well as possible color. And I do this by blowing on the materials with air pressure, hand applying it or a combination of both. This is another fun step that impacts how the end product or project will turn out and is born out of this process. I use simple cement trowels, sometimes stamps, (called “skins”) and brushes to achieve the look and texture of the rockwork I want. Now we’re almost done!
PAINTING: This is the last and final step. It’s also one of the most challenging. Getting the color to look “right” or natural takes practice. Both in mixing the correct colors and then in applying it to the project. I personally mix my colors for each feature using paint pigments from a painting store and one gallon high quality exterior latex paints. Earthen tones making the most sense as you would expect. They’re mixed in used one gallon juice containers and then sprayed on with one quart hand pump spray bottles. The kind you can buy for spraying fertilizer or bug spray. I start out with light colors and then finish with the dark ones spraying it on in fairly thin layers. After that the hope is that I’ve achieved a finished natural and fully functional fake or faux rock project.

FINAL THOUGHTS: These are the approximate steps. Each one is important and leads to the next. And like every process of creation, building, or construction executing each phase needs to be carried out correctly, with the right materials, tools, and skills. All of which I learned by doing. By experimenting. By messing up, cleaning up and starting over. You, however can skip much of what I went through. Because there is a lot more information available now. All you need to do is search around. Read, take courses online or in person. Take a training or invest in a workshop. It’s up to you. So I invite you to begin, (or continue), your journey of discovery and growth. It’s something I will never stop doing cuz it’s just so darn much fun leaning new stuff, creating new things, and making people happy. What could be better than that? PS: to learn all the details about building faux rock projects check out my new book Makin’ Rocks. There’s also free pdf downloads at my online store as well.
- Dave :)